Exporting the project into a video file
In order to export the visualization of a project into a video file, go to Tools -> Image Series for the respective settings. To apply the settings, submit with a click on OK. The video will be saved in the work directory. The exported video can be played by every device, which support the resolution and file format. A series of images of the current display is created. I.e. you have to select the view before calling the submenu of the image series.
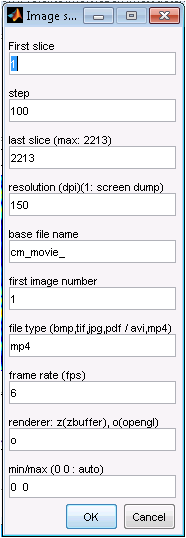
setup window for video exportation
First Slice: Slice number of the data series, with which the video has to start.
Step: Step width, with which the slices have to be included into the video. With a step width of n > 1, every nth slice is inserted. The sequence can be plotted backwards. Then the number of the first slice must be larger than the number of the last slice. The sign of step is not evaluated.
Last Slice: Slice number of the data series, with which the video has to end.
Resolution: Number of pixels per inch (dpi) of the video. An input of 1 creates images with the screen resolution and only the panel of the image is printed. The default value is 150 dpi.
Base File Name: Naming of the video. The default name is cm_movie_, with the image number automatically appended at the end.
First image number: First number of a picture series. This makes it easier to convert multiple image series into a video by post-processing.
File Type: Enter an image or video format. Supported image formats: bmp, tif, jpg, png, pdf. Video formats: avi, mp4.
Frame Rate: Frames per second of the video. Attention, when there are a few slices, a high frame rate is not recommended, because a quick sequence of the slices will make the video too short. A high frame is only recommended when there is a high amount of slices in the video. The default value is 6 frames/second.
renderer: Selection of the graphic renderer. Usually you use ‘o’ for OpenGl. This is a hardware supported image output. If the results are not satisfactory, you can switch to ‘z’ for Z-buffer. The output will then be rendered by software.
min/max: Manual setting of the minimum and maximum of the displayed amplitude range. (This only makes sense if the data is positioned exclusively by the local coordinate system, otherwise each image has its own amplitude range.)
gui on: With gui on == 0 you switch off the input elements of the main window. Nevertheless the whole window will be rendered and saved (if Resolution = 1 is not selected). The background of the image is switched to white.